If you’ve ever owned a PlayStation or even played a few games on it, then you’re aware of how delightful the whole experience is. PS has always been a dream among kids and adults who enjoy gaming because it provides plenty of games to play with stunning but smooth graphics. The fact is that you can play up to 8 players at a time using controllers, which results in having a great time with family members or at parties and crazy get-togethers!
While it’s true that PS games are sometimes exclusive to the console players and do not see a release on other platforms, you can still enjoy them. How? You may wonder, well, believe it because now you can play these games even on your Android Phones now.
PPSSPP is a unique emulator that allows you to enjoy hundreds of PS1, PS2 and PSP titles on your android devices. The PPSSPP emulator contains all the required features to play your favorite PS games without compromises. Not only you can save game states but also tweak the graphics in various ways without losing the ability to play in High Definition.
To enjoy your favorite titles on Android with excellent graphics quality that match the console, some of the described changes will have a great impact on the visual aspects as well as the performance.
Let’s learn with our proper guide to configure PPSSPP on Android!
How to Configure PPSSPP on Android
Although the original native resolution for most of the games on PSP is limited to 480×272 pixels, some UMD disks are furthermore capable of reaching a higher 720×480 pixels resolution. Despite the seemingly low resolution, the 3D environments containing textures with impressive processing capabilities could still deliver good looking visuals in higher resolutions too. If you fine-tune the graphics configuration of the emulator, you can achieve a superior quality that outmatches even the HD remakes of popular gaming titles.
Let’s achieve this feat by focusing on the emulator version of PPSSPP for Android. The best way to initially check the graphics is by loading the game and manually adjusting various provided options to test the graphical and performance changes in the game.
To proceed with the testing phase, you’ll be required to load a game and then pause it to navigate to the Game Settings. Following is a list of a host of graphical changes that you could make complete with the details of what each of them signifies based on its function.
Rendering mode
- Backend: On default, the OpenGL rendering method will be chosen for you.
- Mode: If your aim is to apply the post-processing shader, then you must ardently also use buffered rendering. However, if your device lacks the latest hardware there’s still no need to fret because you could then enable skip buffer effects which will mask pixelation while also providing a little higher resolution. It’s also crucial to note that enabling it could make you face serious viewing problems in your game.
- Simulate block transfer effects: This provision deals with the buffered rendering mode option and it is a more optimized option than the read to memory mode, yet it seems to yield almost the same results.
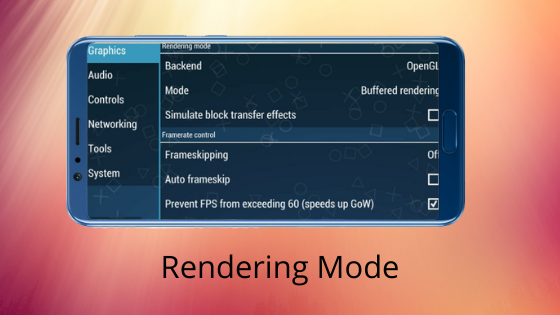
Framerate control (FPS)
- Frameskipping: Since this option does not have a great effect on the emulator’s overall performance, it’s still not advisable to enable it because the lack of images displayed per second on the screen can seem to show negative effects causing lags or even crashes.
- FPS lock: By preventing the FPS(Frames per second) from exceeding the limit of 60 would allow a person to correctly play any game with stability by rectifying the ghosting problem that is evident in some titles.
Optimizing Graphics Features
- Postprocessing shader: You are given a wide range of filters that can be used to improve and soften images at high resolution. You’ll get the sharpest image by enabling the FXAA to adequate levels depending on your personal preference. If the game is a 2D type, then it’s better to disable shaders to properly enjoy beautiful big pixels or use it diligently on 3D games.
- Immersive mode: The function of this mode is to hide the virtual navigation buttons on the screen which prevents accidental exits and also increases the accessible area of the screen.
Performance Features
- Rendering Resolution: Here we must stray for a bit to explain that the viewing resolution is not the same thing as the rendering resolution of the images being depicted on screen. It’s impractical to set the resolution to more than 1080p even if your device supports it. All the efficient possibilities in this feature are based on the multiplier of the original resolution of the game because certain shaders require that extra resolution. To make a case, the 2x rendering offers an output of 960×54 (if the original resolution is at 480×272). Thus the 4x should sail your ship just fine and smooth.
- Display resolution (HW scaler): In relation to the previous feature, you’ll need to work on a little calibration to optimally scale your screen. The ideal is a 2x multiplier of the native resolution and which could work on most devices except for the ones using the 4:3 aspect ratio. Thus you must manually try out the different options to see which works the best in accordance with performance and stability.
Texture scaling
- Upscale type: With this option, you’re allowed to add depth to textures if they have a low resolution or are too close to the camera. Find an equilibrium between quality and performance in different titles separately and remember that on 2x with xBRZ filter, you’re good to play at 1080p.
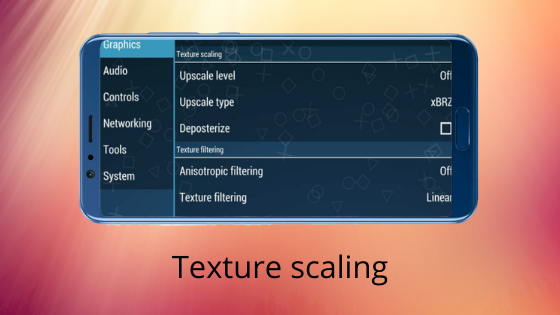
- Texture filtering: This feature is beneficial in 2D games if you keep it on automatic and nearest but in 3D games, it won’t have a significant effect on the typical superimposed graphics and the HUD.
- Screen scaling filter: You can soften your scaled image by using this feature and using the nearest mode and the linear mode for 2D and 3D games respectively would show promising results.
Final Words
Working around with these options would grant you marvelous results and if you’d like to increase the visible area of the screen then, you could navigate to Features > Display layout editor to adjust the position of your HUD controls.